
STRADA-2X2 INSTALLATION GUIDE
The following instructions should be observed before using the product to ensure reliable assembly. Fastening can be done by using screw, tape or adhesive. Recommended operating temperature (PMMA) is -40°C to +80°C.
1. Heat sink machining 2. PCB Layout 3. Screw requirements 4. Assembly 5. Fastening1. HEAT SINK MACHINING
- Cable holes and screw thread holes must be done before lens assembly.
- Ensure that anodized heat sink surface is even
- Correct thickness of the PCB is 1.6 mm (position pin lenght 1.1 mm)
- Screw thread hole accuracy is +-0.1 mm
- Screw vertical straightness tolerance is +-⊥0.1 mm A
2. PCB LAYOUT
- Minimum of two (2) position pin holes are needed for accurate lens assembly, depending on the desired direction of the lens
- If fastened with screws, at least one (1) is needed to attach lens from the middle, other four (4) places on the sides are optional
- Recommended width for position pin holes is 2.10 mm (-0 mm +0.1 mm)
- One of the pin holes is oblong shaped, for the plus pin is for alignment and the minus pin prevents the lens from twisting

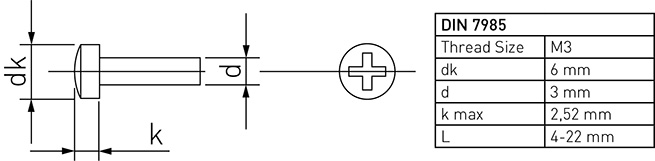
3. SCREW REQUIREMENTS
- STRADA IP2x6 lens attachment screws are of type M3. (DIN 7985, ISO 7045/ISO 14583 TX)
- Countersunk screw is not allowed
- Self-tapping screws are not recommended
4. ASSEMBLY
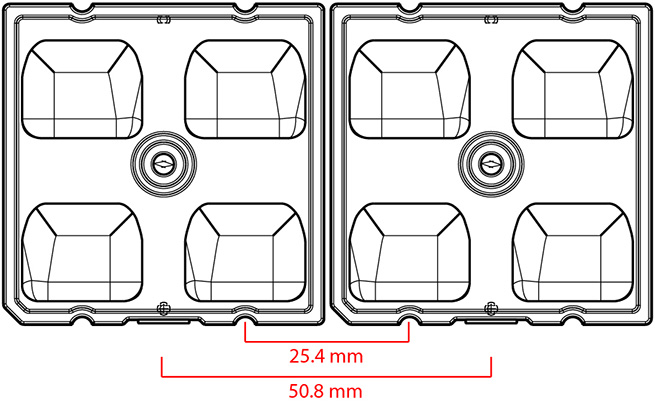
- Optimal distance between STRADA-2X2 lens modules is 50.8 mm, so that the same spacing (25.4 mm) continues between optics
- It is recommended to calculate the spacing using the position pin holes
5. FASTENING
Fastening can be made either with using screws, tape or adhesive Please note: Like all PMMA lenses STRADA-2X2 is also prone to environmental stress cracking. Please make sure that chemicals used in the fixture manufacturing do not cause stress cracking risk with PMMA.SCREWS
- Maximum tightening torque for the center screw is 0.6 Nm
- At least one screw (1) is needed to attach the lens from the middle, other four (4) places on the sides are optional
- Tightening torque for the four (4) optional screws on the sides needs to be defined during the assembly (depends on screw support)
- Note that when using screws for fastening, there can’t be anything flexible material between the lens and the PCB, for it my cause the lens to bend or crack
TAPE
- Recommended to use LEDiL tape C14151_STRADA-2X2-TAPE
- Tapes can be used to absorb some of the vibration
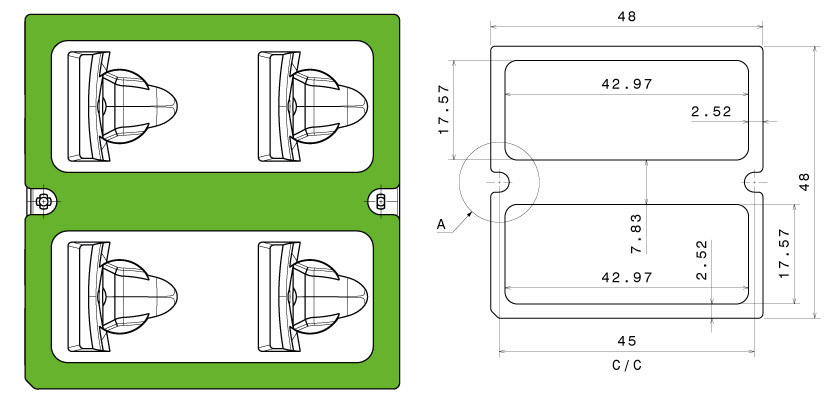
ADHESIVE
- Use thin layer of adhesive on the area marked in green
- In automated process it is easier to put glue straight to the PCB
Find all related products
The information contained herein is the property of LEDiL Oy, Joensuunkatu 13, FI-24100 SALO, Finland and is subject to change without notice. Please visit lediloptics.cn for additional information, such as the latest photometric files, 3D mechanical models, and application notes relating to handling, gluing and taping.